
The Ultimate Guide to Sharpening Wood Carving Tools: Handyman Tips and Tricks
Table of content
Are you a woodworking enthusiast looking to elevate your craft? Sharpening wood carving tools is a crucial skill that can make a world of difference in your projects. But where do you start?
Welcome to ‘The Ultimate Guide to Sharpening Wood Carving Tools: Handyman Tips and Tricks’. In this comprehensive guide, we will take you through everything you need to know to keep your wood carving tools sharp and in top condition.
From understanding the different types of carving tools to selecting the right sharpening method, we’ll cover it all. Discover expert techniques for honing the perfect edge, maintaining the ideal bevel angle, and achieving razor-sharp results every time.
Whether you’re a seasoned woodworker or a beginner, our easy-to-follow instructions and handy tips will empower you to sharpen your tools like a pro. Unlock the full potential of your wood carving projects by ensuring that your tools are always in their best shape. Get ready to take your woodworking skills to new heights with our ultimate guide.
Importance of sharpening wood carving tools
Sharpening your wood carving tools is a crucial aspect of maintaining the quality and efficiency of your woodworking projects. Sharp tools not only make the carving process easier and more enjoyable, but they also produce cleaner, more precise cuts and reduce the risk of accidents. Dull tools require more effort to use, can cause the wood to tear or split, and increase the likelihood of slips and injuries.
When your tools are sharp, you can create intricate details, smooth surfaces, and complex shapes with greater ease and control. Sharp edges allow you to make delicate cuts, remove thin layers of wood, and achieve the desired finish without excessive force or damage to the material. Conversely, dull tools can cause the wood to crumble, create ragged edges, and make it difficult to achieve the desired results.
Regular sharpening also extends the lifespan of your wood carving tools. By maintaining the proper edge, you can prevent premature wear and tear, ensuring that your tools remain in top condition for years to come. This not only saves you money in the long run but also allows you to consistently produce high-quality work without the frustration of constantly replacing dull or damaged tools.

Tools and materials needed for sharpening wood carving tools
Sharpening your wood carving tools effectively requires a few essential tools and materials. The most crucial item is a sharpening stone or whetstone, which comes in a variety of grits and materials to suit different sharpening needs. Coarser stones, such as those with a 1000-grit or lower, are ideal for quickly restoring a dull edge, while finer stones with a 4000-grit or higher are used for honing and polishing the edge to a razor-sharp finish.
In addition to the sharpening stone, you’ll need a honing guide or sharpening jig to help maintain the proper bevel angle on your tools. These devices hold the tool at a consistent angle as you sharpen, ensuring a consistent and accurate edge. A leather strop, which is a piece of leather stretched over a flat surface, is also a valuable tool for polishing and refining the edge after sharpening.
Other helpful items include a sharpening lubricant, such as water or honing oil, to keep the stone and tool cool and prevent overheating. A magnifying glass can be useful for inspecting the edge and ensuring a clean, even sharpening. Finally, a set of fine-grained sandpapers or abrasive pads can be used for light touch-ups and polishing the tool’s surface.
With these essential tools and materials, you’ll be well-equipped to sharpen your wood carving tools to perfection, ensuring optimal performance and a smooth, efficient carving experience.
Step-by-step guide to sharpening wood carving tools
There are three steps in sharpening your wood carving tools: sharpening, honing and stropping. In this article we are using the term sharpening to cover those operations that establish the cutting edge of a tool, but that probably leave the edge not actually sharp enough to use. As used in this article, the term honing means to get the established edge sharp enough for actual use, and stropping means to further refine the edge to the point where it is better and smoother. We will try to explain all the three steps and if you carefully follow them your wood carving tools will be perfectly sharp.
Sharpening
If your carving tools have worn or chipped edges the first thing you need to do is to straighten up the edges. This is not an operation that has to be done too often, but if a chunk gets taken out of an edge then the edge will have to be straightened out before any other sharpening operation is performed. You can use horizontal belt sander with a 150 grit disk for this operation and it will straighten up the edges of your gouges perfectly. When using power sanders for sharpening operations be extra careful. The high speed of the disk generates a lot of heat very quickly, and that amount of heat is enough to take the temper out of the blade. Keep a container of cold water on the table and constantly dip the blade in the water during the operation. The tool should not be in contact with the disk for more than a second before the tool is dipped into the water. If you see the metal start to turn colors it has already gotten too hot.
Now the edge is straightened up and a roughly sharp edge can be established on the tool. Use the horizontal belt sander for this operation as well and with 320 grit aluminum oxide. Keep the water container close in this process as well, and keep dipping the edge in the water every second or so. Carving tools with straight edges, such as chisels and parting tools are sharpened right over the platen, with the edge perpendicular to the direction of the belt. If you are sharpening the curved gouge, position the gouge over the unsupported space between the end of the platen and the front roller. Carving chisels are sharpened on both sides on the belt sander and the gouges and parting tools are sharpened on one side only.
If you don’t have or don’t want to use a belt sander, these sharpening operations can be done by hand on any flat abrasive sharpening stone of about 320 grit. The process takes much longer but the results are the same.
Honing
After you established a roughly sharp edge it is time for honing. With honing process we will make the blade sharp enough to use. This process can be done with sharpening stones or with sandpaper glued to a glass surface.
There are four types of sharpening stones: oil stones, water stones, ceramic stones and diamond stones. Oil stones uses oil as a lubricant to keep the fine metal particles generated by the sharpening process from embedding into the surface of the stone. Waters stones uses water for lubricant, and ceramic and diamond stones don’t require lubricants. Diamond stones are most commonly used to sharpen carbide wood carving tools.
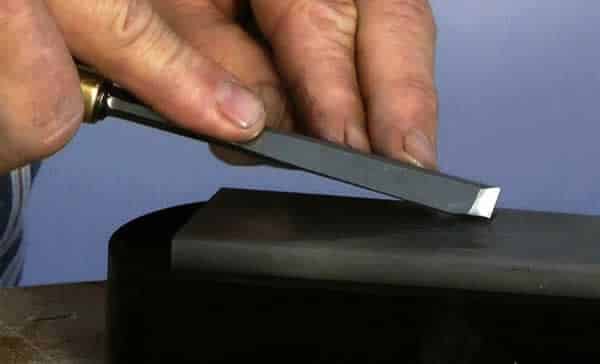
Honing the chisels is pretty simple, just drag the edge across the sharpening stone or sandpaper, one side, then the other, until you’ve established a nice sharp edge. For the tools with straight edges the dragging motion is done perpendicular to the edge of the tool. Gouges take a little more work, as the edge must be scrubbed sideways (motion parallel to the cutting edge) over the sandpaper, moving the gouge in a rolling motion. The motion is started with the near side of the gouge down on the far side of the paper and then the gouge is dragged toward you while at the same time rolling it toward you. The motion ends up with the far side of the gouge down on the near side of the stone or sandpaper. Always start with 600 or 800 grit stone or sandpaper and work your way up to the highest grit you have.
Degree of the tool against the stone or sandpaper is something that is opened to debate. Every woodcarver has it’s perfect angle but we advise you to to keep it in the range between 11 and 19 degrees.
At this stage you have to develop a tin edge. This is a small sliver of metal right at the edge of the blade. To check this hold the tool under a bright light. If you turn the blade on its side and look directly down at the blade edge you will must be able to see a shiny line and that the line is the tin edge. A razor sharp edge held under the light is almost invisible, there is no shiny line down the center of the blade! If you can see the edge of the tool, it’s not sharp yet. But the razor sharp edge will be developed in the next stage.

Stropping
The final stage of sharpening your wood carving tools is the stropping. A good strop must have two sides, one of rough leather and one of smooth hide. On the rough leather side rub in a good layer of strop compound. There are many different strop compounds that can be used and you usually get them when in a set when buying a strop. Lay the blade all the way down onto the surface of the strop, pull away from the cutting edge in nice long strokes! In this stage you will finally lose all the tin edge. Don’t worry, you can never strop too much. For a new tool, about 15 strokes per side is enough. Flip the strop over and work the tool across the smooth leather. Smooth leather gives that wonderful polished look.
At this point you can check if the tin edge is gone by looking directly down at the blade edge. If that edge is has a fine shiny line along it you still have the tin edge. If the blade edge has no shine, you did it, you’ve learned how to sharpen wood carving tools and you have a razor sharp tool!
Tips and tricks for maintaining sharp wood carving tools
Maintaining the sharpness of your wood carving tools is an ongoing process, but with the right techniques and habits, you can keep your tools in peak condition for years to come. Here are some tips and tricks to help you maintain sharp wood carving tools:
- Develop a regular sharpening routine: Make sharpening a consistent part of your woodworking practice. Aim to sharpen your tools before each use, or at least once a week, depending on how frequently you use them.
- Store your tools properly: When not in use, store your wood carving tools in a protective case or roll, or hang them on a tool rack. This helps to prevent the edges from becoming damaged or dull during storage.
- Avoid using your tools on hard surfaces: Always use a cutting board, workbench, or other soft surface when carving. Cutting directly on hard surfaces, such as concrete or metal, can quickly dull the edges of your tools.
- Clean your tools after each use: Wipe down your tools with a clean, dry cloth to remove any residue or debris. This helps to prevent the buildup of materials that can contribute to dulling the edge.
- Use the appropriate tool for the job: Match the right tool to the task at hand. Using the wrong tool, or applying excessive force, can cause premature wear and tear on the edge.
- Consider using a honing compound: Applying a honing compound, such as a sharpening paste or polishing compound, to your leather strop can help to further refine and maintain the edge of your tools.
- Sharpen with the proper technique: Ensure that you’re sharpening your tools at the correct bevel angle and using the appropriate sharpening method for each type of tool.
- Store sharpening stones properly: When not in use, store your sharpening stones in a dry, protected environment to prevent cracking or warping, which can affect their performance.
By incorporating these tips and tricks into your wood carving routine, you’ll be able to keep your tools sharper for longer, ensuring a more efficient and enjoyable woodworking experience.
Safety precautions when sharpening wood carving tools
Sharpening wood carving tools requires careful attention to safety to prevent accidents and injuries. Here are some important safety precautions to keep in mind:
- Wear protective gear: Always wear safety glasses or goggles to protect your eyes from flying debris or sparks. Consider wearing gloves to protect your hands, and ensure that your work area is well-lit to improve visibility.
- Secure the sharpening stone: Make sure your sharpening stone is firmly secured on a stable surface to prevent it from slipping or moving during use. This will help to maintain control of the tool and reduce the risk of accidents.
- Use caution when handling sharp tools: Exercise extreme care when handling your wood carving tools, both before and after sharpening. Avoid placing your fingers near the blade, and always carry tools with the sharp edge pointed down.
- Keep your work area clean and organized: Maintain a tidy work area free of clutter and debris to minimize the risk of tripping or knocking over tools.
- Take breaks and stay focused: Sharpening requires concentration and can be physically demanding. Take regular breaks to avoid fatigue, which can increase the likelihood of accidents.
- Properly store and maintain your tools: Ensure that your wood carving tools are stored safely and securely when not in use, and regularly inspect them for any signs of damage or wear.
- Dispose of worn or damaged tools: If a tool becomes excessively worn or damaged, do not attempt to continue using it. Properly dispose of the tool and replace it with a new one to prevent potential injuries.
By following these safety precautions, you can sharpen your wood carving tools with confidence, minimizing the risk of accidents and ensuring a safe and productive woodworking experience.
Frequently asked questions about sharpening wood carving tools
Q: How often should I sharpen my wood carving tools?
A: The frequency of sharpening will depend on how often you use your tools and the type of work you’re doing. As a general rule, it’s a good idea to sharpen your tools before each use, or at least once a week if you’re a frequent woodworker. However, if you notice your tools becoming dull or struggling to make clean cuts, it’s time to sharpen them, regardless of how long it’s been since your last sharpening session.
Q: What’s the best type of sharpening stone to use for wood carving tools?
A: For wood carving tools, a combination of coarse and fine-grit sharpening stones is ideal. Start with a coarser stone, such as a 1000-grit or lower, to quickly restore a dull edge. Then, use a finer stone, like a 4000-grit or higher, to hone and polish the edge to a razor-sharp finish. You can also use a sharpening system that includes multiple stones or a combination of stones and honing guides for even more precision.
Q: How do I know when my tools are properly sharpened?
A: There are a few ways to tell when your wood carving tools are properly sharpened:
- The edge should be clean, even, and free of any nicks or irregularities.
- You should be able to easily shave the hair on your arm or a piece of paper with the tool.
- The tool should glide smoothly through the wood with minimal effort and produce clean, precise cuts.
Q: Can I use an electric sharpener for my wood carving tools?
A: While electric sharpeners can be convenient, they are generally not recommended for sharpening wood carving tools. The high-speed rotation of the sharpening wheel can generate excessive heat, which can damage the temper of the tool’s steel and alter the bevel angle. For the best results, it’s best to use a manual sharpening stone or a sharpening system designed specifically for woodworking tools.
Q: How do I maintain the proper bevel angle on my wood carving tools?
A: Maintaining the correct bevel angle is crucial for achieving the best results when sharpening your wood carving tools. Most carving tools have a bevel angle between 20 and 30 degrees. Using a honing guide or sharpening jig can help you consistently hold the tool at the proper angle during the sharpening process. Alternatively, you can use the existing bevel angle as a reference and carefully maintain it by eye as you sharpen.
Recommended resources for further learning about wood carving
If you’re looking to expand your knowledge and skills in wood carving, there are numerous resources available to help you on your journey. Here are some recommended resources for further learning:
Books:
- “The Complete Book of Woodcarving: Everything You Need to Know to Master the Craft” by Everett Ellenwood
- “Carving the Human Face: Capturing Character and Expression in Wood” by Jeanne Douphrate
- “The Beginner’s Guide to Woodcarving: Tools, Techniques, and 16 All-Time Favorite Projects” by Mike Shipley
Online Tutorials and Videos:
- Wood Carving Illustrated – Comprehensive tutorials, project ideas, and expert advice.
- Woodcarving Workshops – Extensive library of instructional videos covering various wood carving techniques.
- Woodworking Master Classes – Expert-led online classes and workshops on a wide range of woodworking topics.
Woodworking Forums and Communities:
- The Woodworking Network – Vibrant online community for woodworkers of all skill levels.
- r/Woodworking – Active subreddit with a wealth of information and discussions on wood carving and other woodworking disciplines.
- The Woodcarving Illustrated Forum – Dedicated forum for wood carvers to share ideas, ask questions, and connect with fellow enthusiasts.
By exploring these recommended resources, you’ll have access to a wealth of knowledge, expert guidance, and inspiration to help you take your wood carving skills to new heights.
Conclusion: The importance of regular tool maintenance and sharpening in wood carving
In conclusion, sharpening your wood carving tools is a crucial aspect of maintaining the quality and efficiency of your woodworking projects. Sharp tools not only make the carving process easier and more enjoyable, but they also produce cleaner, more precise cuts and reduce the risk of accidents.
By understanding the different types of wood carving tools and the proper techniques for sharpening them, you can unlock the full potential of your craft. Mastering the art of tool maintenance and sharpening will allow you to create intricate, high-quality woodworking projects with greater ease and control.
Remember, regular sharpening is key to keeping your tools in top condition and extending their lifespan. By incorporating a consistent sharpening routine into your woodworking practice, you’ll be able to consistently produce exceptional results and enjoy the satisfaction of working with sharp, well-maintained tools.
So, embrace the importance of sharpening and make it a regular part of your wood carving journey. With the right tools, techniques, and a commitment to tool maintenance, you’ll be on your way to elevating your woodworking skills and unlocking new creative possibilities. Happy carving!
About the author – John Barnes
 Handyman tips website was created by John Barnes from Phoenix, Arizona, in February 2014. John wanted to share with the public his 20 year experience in home improvement as a contractor and avid woodworker. John noticed that there aren’t many expert advice online and he wanted to help the public to get true expert tips and estimates. What started as a hobby soon became a full time job as Handyman tips website became very popular because of the quality of tips it provides. After a few years John has introduces a couple of new content creators into Handyman tips team but he is still the main content creator on Handyman tips website.
grinding, whetting, honing and stropping, how are these processes arranged chronologically
I don’t have much of a problem with gouges,but with the v-tool to get the correct shape on the bottom gives me all the problems that I need in sharpening carving tools.
Hi Maria,
this article is about sharpening wood carving tools not about sharpening wood! If you want to ask a question contact us through our contact form with details about your problem!
How to sharpen wood with a knife